After Thanksgiving is over and only a few weeks until Christmas, I like to finish my outdoor decorations off with a few DIY wreaths. After weeks of cleaning out landscapes and gardens, wreathmaking is a welcome break and a time to rekindle my imagination. Even though making a DIY wreath is easy, every wreath comes out different with its own unique look.
I started wreathmaking a few years ago as an added income maker for Christmas gifts, and it has developed into full wreath kits by Grimm’s Gardens as well as wreathmaking classes. I have also made wreaths in the past which were woven from grapevines, but that work is more difficult and time consuming.
Making a DIY wreath for Christmas that will last until mid-January is rewarding. Every wreath I make is unique and contains a little be of my own imagination in it.
Collecting Plant Materials for DIY Wreath Making
For DIY wreath making, I use only organic materials, at least for the important parts. I prefer to use locally sourced greens, berries, pinecones, and dogwood branches. Sometimes I go to the local tree dump for evergreens that have been removed from landscapes. These might include the branches of white fir, blue or Norway spruce, holly, boxwood, or yew.
Greens and Where to Get Them
Most greens are easy to find if you live out of the city limits. If you live in rural areas where trees grow wild in ditches, you may be able to find greens easily. In town, only cut from trees on your property, or get permission from a neighbor to remove a few branches from a tree.
TREES
- Eastern Red Cedar – I usually use these as the mainstay of DIY wreath making, because the female plants are loaded with bright, blue berries and the foliage is thick and easy to use. In the Central Great Plains, cedar trees are in every windbreak, and grow wild in almost every ditch.
- White Pine – this evergreen is easy to work with as the needles are relatively soft in comparison to other pines. It grows in many windbreaks and is native to New England and the Upper Midwest.
- Blue Spruce – this is the best green for adding in rigidity to the wreath and is great for making swaths. I usually can find it at the local tree dump. It is native to the Central Rocky Mountain regions.
- White Fir – also known as concolor fir, the soft blue-green needle clusters of this fir are great for DIY wreath making. I have a few places where they are used in windbreaks, otherwise I get it from tree dumps. It can be found growing wild in the Western U.S.
- Other Firs – Balsam and Fraser fir are harder to find locally, but can be purchased from Christmas Tree farms and the branches stripped for DIY wreath making.
- Arborvitae – both Oriental and Western arborvitae can be used in DIY wreath making. I like to use them at the back of a cluster in the wreath because the leaves are mostly flat and good for holding the other plant materials.
SHRUBS
- Yew – the dark evergreen needles of various species of yew are quite useful for DIY wreath making. They are thick and lush and much darker than other greens. I can find them in tree dumps or overgrown landscapes. Always ask before cutting from other gardens.
- Boxwood – this evergreen has rounded leaves instead of needles and adds good texture to the wreath. I get it from tree dumps and overgrown landscape plants.
- Holly – there are various types of holly. All the evergreen types are good for DIY wreath making, but can be difficult to source. If you live where American holly grows wild (Southeast U.S.), then you may be able to find some wild. I get it it from tree dumps when available.
- False Cypress – this evergreen shrub is used for ornamental purposes in the garden, but adding just a few clippings to a DIY wreath can make it pretty.
Collecting Berries
When collecting berries for DIY wreath making, you want to use those that are the least chosen by birds. These are berries with hard outer coatings, that usually last through the winter. If there are good seedheads, and other berries within the landscape available, then birds will usually leave your wreaths alone.
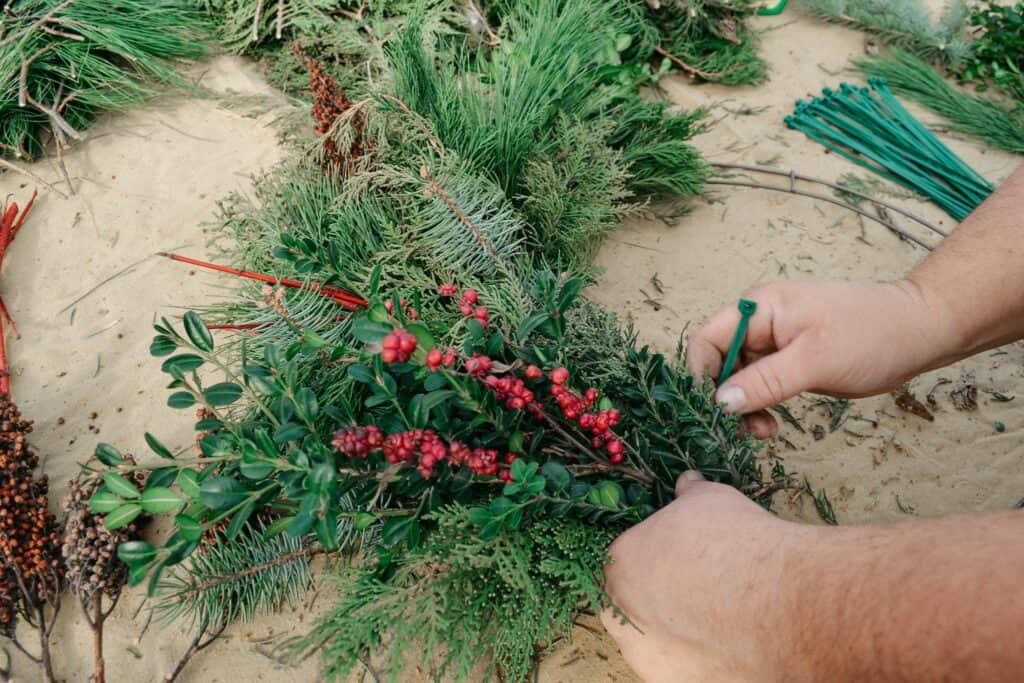
- Coralberry – also known as Indian currant or buckbrush, coralberry is common along woodland edges throughout the Central Great Plains and Midwest regions. The berries can be light pink to almost dark red and grow in clusters on the end of woody stems. I get them from wild areas only.
- Sumac – smooth sumac grows wild throughout the Great Plains and Midwest and up into New England. The berries are bright red and grow in large cluster on stiff stems. I use 4 to 8 stems of berries per wreath.
- Beautyberry – grown in landscaping for its lavender to purple berries, beautyberry is quite wonderful when added to a holiday wreath or other display. American beautyberry grows wild in the Southeastern U.S.
- Arrowwood Viburnum – the most common landscape variety of this is ‘Blue Muffin’ which forms a large clump. The berries, which are dark blue-black can be added to a bird-friendly wreath or arrangement. They are softer than other berries, so they are not best for DIY wreath making. They are native to the Southeast U.S.
- Holly – various holly species produce hard, red berries suitable for wreath making. Deciduous holly and winterberry holly both lose their leaves and are better for use in arrangements. Both are native to the Southeastern and Eastern U.S.
Other Plant Materials
You can choose to use only the above materials, or other berries and greens associated with your region. But there are a few other plant materials I like to mix into the DIY wreath before its ready to present or sell.
- Red and Yellow Twig Dogwood – these stems have either red or yellow bark color and are grow specifically for their ability to have it. We grow a large row of both red and yellow twig dogwoods just for use in holiday arrangement and wreath kits. I like to cut the stems to about 8 inches long for us in DIY wreath making.
- Pinecones – I use the larger cones of the Eastern white pine which grows in in windbreaks. Most people are fine with taking pinecones if you ask, they do not like mowing up or raking the cones. I use floral wire and tie 3 cones together, then add groups of 3 together to make 6 or 9 for a bunch and add it into the wreath.
- Milkweed pods – the large pods of common milkweed can be saved on or off the stem and glued or added to the wreath for a unique look. I remove the seeds and down first so the pods are empty.
Tools Needed for DIY Wreath Making
For DIY wreath making, there are several materials you will need to get first, even before you find greens, berries, and twigs. These materials will help you put it all together. If you need a wreath making kit, Grimm’s Gardens sells these online and includes a ring, zip ties, and greens/berries.
- Wreath ring – I prefer to use a double ring between 16 and 24 inches in diameter. You can order heavy duty ones online or buy from the local craft store.
- Zip or Cable ties – these are needed to tie the bunches of greens/berries to the wreath ring. I tried once with wire, then quickly determined zip ties are the best way to go. A 100 piece bag of 9-11 inch ties is best.
- Pruners – you will need these not only to cut the greens and twigs to length, but also to cut the extra off the zip ties. I use Felco #11 pruners for all my DIY wreath making.
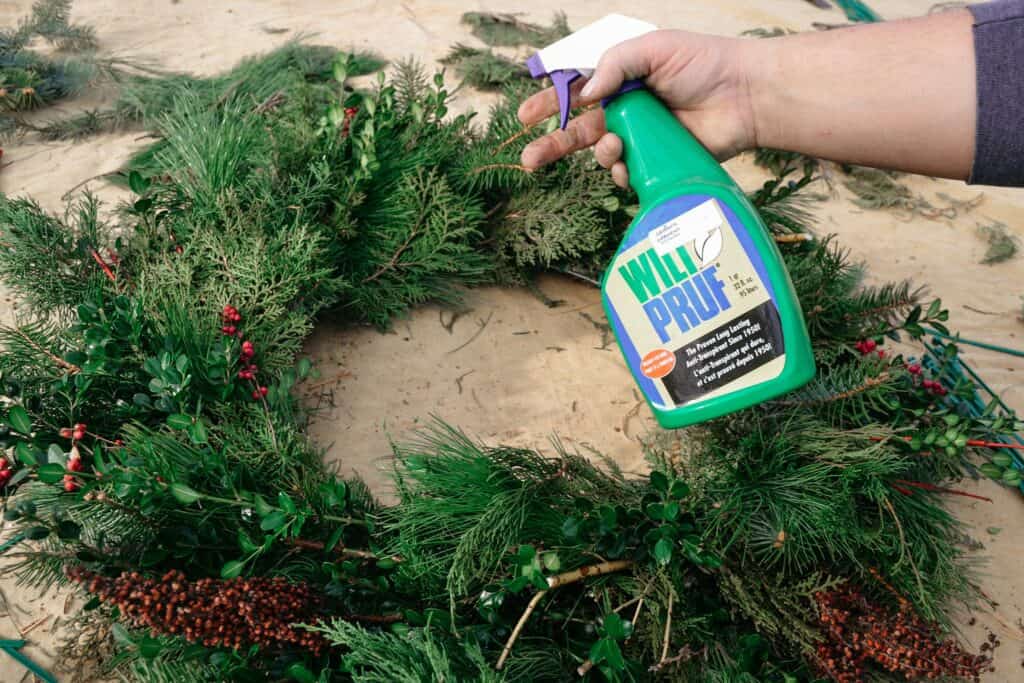
- Wilt Pruf – this is an oil based anti-desiccant that keeps the needles of evergreens from drying out to quickly. Spray the entire wreath after you finich making it.
Making Your DIY Wreath Step by Step Guide
Once you have all your materials collected, separate them into groups with baskets or crates, to keep materials organized. Put you wreath ring in front of you on the table and have all your materials close by. Also, check out our YouTube page here for a helpful video.
STEP 1
The first step is to make a stacked layer of materials in to a bunch. Using a few sprigs of arborvitae, layer on top a few sprigs of pine, or cedar, or boxwood, or whichever green you want. I always start with a bunch of greens first. Lay the bunch on the ring along the left side of the ring. See diagram below. Then zip tie the bunch to the ring, and clip off the excess tie.
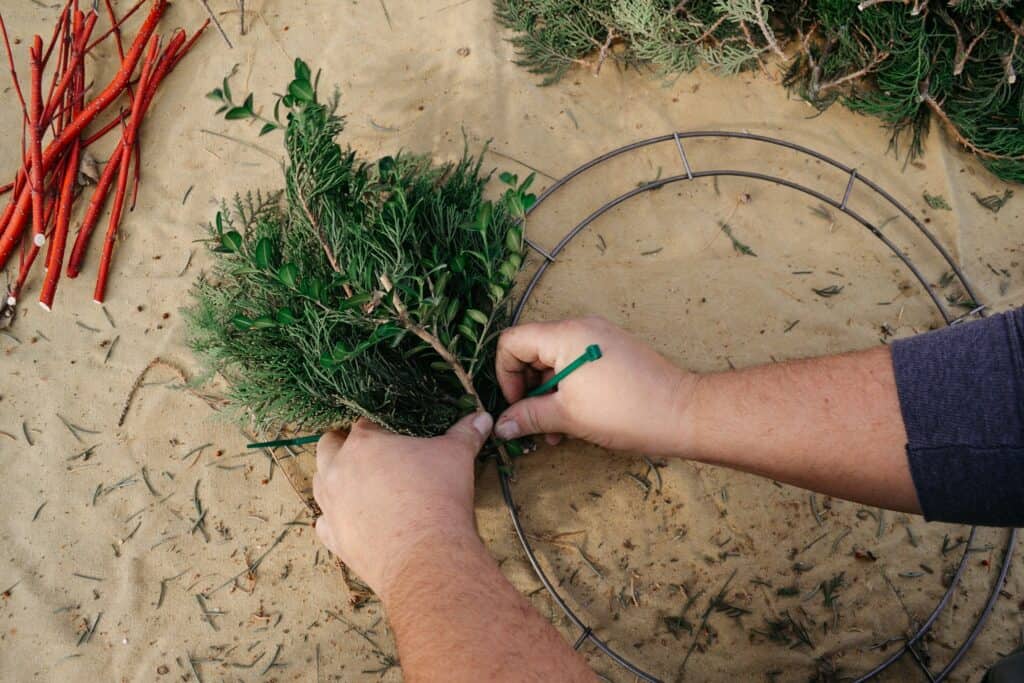
STEP 2
For the second step, repeat the first part of step 1, but add in a berry bunch, or a few dogwood twigs. Then repeat the rest of step 1. As you layer each consecutive bundle, turn the ring so the bundle is angled parallel to the left side of the ring and the bundle covers the preceding zip tie. Continue this repetition of steps until you have on one spot left before the original bundle.
STEP 3
Once you reach the first bundle, prepare the last bundle, then lift the first bundle up carefully, and place the last under the first. Zip tie it into place and then cut off the excess tie.
STEP 4
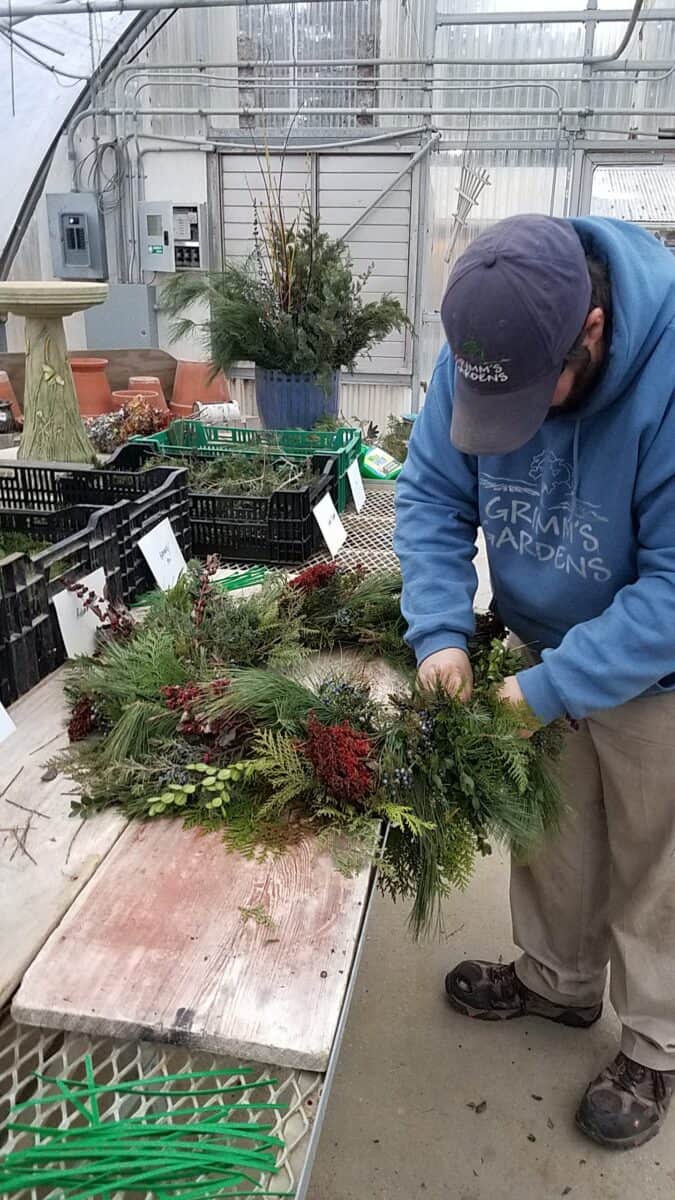
Your DIY wreath is complete! Now for finishing touches. Spray the whole wreath generously with Wilt Pruf or similar product to keep the greens fresh for as long as possible. After it dries (about 30 minutes), add in a bow or pinecone cluster, tying them securely to the frame. Hang wherever you want (indoors lasts for about 4-6 weeks, outdoors they may last 6 to 10 weeks).
Conclusion
Making your own wreaths is both rewarding and cost effective for those who decorate a lot for the holidays. Finding the materials can be frustrating, if your are on deadlines like me, but it can also be quite fun and you can make it into a game if you have kids who want to help. Just remember to have as mush fun as possible.
Happy planting!