This year has seen many new gardeners as people run to find things to do while quarantined. I have seen a run on seed sales, and tons of new questions on all kinds of garden problems, from insects to picking times, to diseases, and more. As we wind down this year, we need to begin to plan and prepare for next year’s garden.

Designing the Vegetable Garden
Before you layout the garden for next year, you will want to put together a list of what you want to grow, based off your results from this year. Also, it is important to decided if you are going to plant in beds or rows, or in containers. You do not need to put down varieties until you are ready to order.
For example, my garden list has the following vegetables, herbs, and flowers on it.

Once you have your list, and you know where your garden is going, you can begin to plan it out.
Garden Placement
I learned a long time ago that the best place to put a new garden is in full sun. Many urban gardeners will not have this, as cities are full of large street and shade trees. You will want between 6 and 10 hours of sun per day, if possible, to grow most vegetables and flowers. This may mean taking out some lawn to create your garden.

When I was surveying my backyard for my garden, I picked out the most level spot, approximately 100 feet long by 50 feet wide. This area is ideally suited, for it gets at least 8 hours of sun per day. However, the soil throughout my backyard is low in organic matter, and was heavily farmed in the 1900’s, before no-till cropping was available. It was turned out of cultivation in 1978, and no effort to restore the soil was made.
When you have to fix the soil before you can garden, or while you are gardening, it can make for some tough years and poor crops. But, if you are like me, and love to garden, and spend time outdoors, then you will enjoy the challenge.
Design Ideas
One thing I learned when studying landscape design, is that even the vegetable garden does not need to be straight lines and squares. The new plan for my vegetable garden is a circular design (see below photo). I am starting with 10 foot diameter half-circle, then curved beds 2 to 3 feet wide in radiating arcs around the half-circle.

If you are more comfortable with straight rows and blocks in the garden, there is nothing wrong with that. For many, the old-fashioned way of gardening in straight rows is all they are willing to cope with. However, I will be doing permanent raised beds that will not be tilled each fall or spring.
Permanent Raised Beds versus Tilled Beds
But what is the deal with permanent beds? Permanent beds allow the soil to settle and not be disturbed as much. This prevents weed seeds from being brought up with each working of the soil. You can also plant perennial flowers and herbs in beds that are rotated between smaller crops.

Tillage actually creates a hard surface of compaction under the area that is tilled, making it hard for roots to break through. This means that you actually have to water more often in beds that were tilled.
By continuing to add organic matter (OM) to the top of the soil, you can keep the bed built up and not destroy the OM with tilling. Organic materials that are added to permanent beds include mulch, leaf mold, compost, and grass clippings.
Bed Spacing
Once you have a general idea about what beds where and whether or not to do permanent beds, you must think about spacing. Different vegetables need different amounts of space or light. For example; pumpkins, gourds, winter squash, and melons need the most amount of space, and should be placed where the vines can run.
Cucumbers, pole beans, peas, and cantaloupes can be trellised, so they do not need as much space. But tomatoes, if left uncaged or trellised, will need lots of room too. Plan to plant sweet potatoes or potatoes in large blocks.
Garden Bed Rotation
I am sure you have heard of it, if you gardened this year; crop rotation. Crop rotation is moving high-need crops around in the garden to lower the risk of continual diseases, and allow the soil to be restored. Crops that should not be planted in the same place year after year include corn, potatoes, tomatoes, pumpkins, squash, cucumbers, and sweet potatoes.
These crops are either heavy feeders, meaning they use lots of nutrients, or they have soil borne disease issues. By planning your garden to have rotational beds, you can grow your crops with less nutrients or pesticides.
I recommend at least a 5 year rotation, where in year 1 corn would be in a certain bed, but not be in that bed again for 5 more years. This keeps diseases at bay in crops like tomatoes and potatoes. An example of a 5 year rotations would be:
- Corn and Pole Beans
- Pumpkins
- Tomatoes
- Sweet Potatoes
- Potatoes
Reading a Seed Packet

No matter whom you get your seeds from, all packets or catalogs have similar information that may be tricky for a new gardener to read. Here are some explanations for the different parts of a seed packet.
- Days to Harvest – This is the average number of days from planting to harvest for an individual crop. So golden beets will be sized to pick, approximately 55 days after planting, if they are watered and fed correctly.
- Days to Germinate – This is the average number of days it takes for correctly planted seed to sprout and begin to grow.
- Planting Depth – This is the depth that the seed for that variety should be planted below the soil surface.
- Location – This is where in the garden the crop should be located. If it says full sun, it needs at least 6 to 8 hours of sun per day to grow properly.
- Planting Time – This tells you when the best time for planting and succession planting would be.
There are also many other interesting facts about plant on the packet or in the catalog that can help you choose the best variety to grow. Harvest and Use sections tell you what to look for when picking, and often there are recipes in catalogs. There are also usually Growing Notes or a Care Guide to tell you when to fertilize, water, etc.
Adding Perennials to the Vegetable Garden
Perennial flowers and vegetables can be added to permanent beds or used to border the vegetable garden. I like to use perennials and herbs that attract lots of pollinators and beneficial insects. Adding in edible flowers and perennial vegetables is also a benefit to the garden.

Perennial Vegetables
These perennials provide extra food without the yearly cost of seed and planting.
Perennial Herbs
While many of our favorite herbs are annuals in Zones 3-6, these are generally perennials and are great for the garden.
- Thyme
- Oregano
- Lavender
- Sage
- Burnet
- Lovage

Perennial Flowers
While you can add almost any flower to the garden, these are great for attracting pollinators and/or have edible parts.
- Daylilies
- Coneflowers (Echinacea species)
- Rudbeckia
- Catmint (Nepeta)
- Salvia
- Yarrow
- Tall Sedum
- Agastache
- Bonesets (Eupatorium species)
Cover Cropping in the Garden
Many gardeners use a variety of cover crops in the garden. The use of cover crops can benefit the soil, add organic matter, and cover empty space after or between crops.
Types of Cover Crops
When planning the garden, keep in mind different types of cover crops for different areas. Large blocked areas where pumpkins, squash, potatoes, or melons were raised are perfect areas to plant cover crops in. Fall planted cover crops will grow up, then die down in winter, and then regrow in spring before you mow or till them down to plant.

Fall Planted Cover Crops
These include:
- Oats and Field peas – planted in September they will grow for a month or more, then die down after a hard freeze, then grow again in spring before being tilled or mown down before planting
- Winter rye – and annual grain that grows well in fall and milder winters
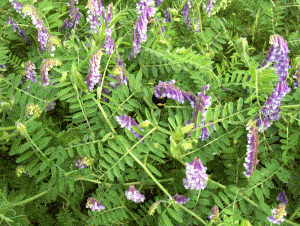
- Hairy Vetch – I really like this summer to fall planted annual, it has flowers for pollinators and fixes nitrogen for the soil
- Tillage radish – these have large and long taproots that break up the soil and provide air spaces as they rot and die (but be warned, they stink horribly as they rot away)
- Leftover garden seeds – old seed packets leftover from previous years, such as beans, peas, annual herbs and flowers, mixed together and planted in August. They provide leafy cover and potential flowers for late-season pollinators until a hard freeze kills them
Summer Planted Cover Crops
These include:
- Buckwheat – a broadleaf grain that is prized for quick growth. Once chopped or mown down it provides long cover and organic matter
- Crimson or alsike clovers – These annual clovers fix nitrogen in the soil and the blooms are relished by pollinators
How to Use Cover Crops
Plant summer cover crops in beds that cannot have succession plantings through the heat of the summer. These beds include ones dedicated to leafy greens, peas, or onions. Once those crops have finished and the material is gone, plant summer cover crops to fill the gap between fall planted crops.
Example: A large spinach bed or row that was planted first in April, and harvested and succession planted through June, then turned or tilled under in late June. Plant Crimson Clover after the final turn in June and then till or mulch mow that down in early August, before planting more spinach the first week of September.
Plant fall cover crops after large blocks of vegetables have been harvested. These include potatoes, sweet potatoes, corn, melons, pumpkins, and squash. Remove as much of the old stems and vines as possible to compost pile (these are better removed to prevent disease or insect carryover).
Example: Sow in winter rye, hairy vetch, or other fall cover crops that will grow and cover the ground in late fall, winter, and early spring. Till or mow down the crop in mid-spring (April to May) before planting the next crop.
Conclusion
Now you should be ready to start planning for next year’s garden!


