Growing tomatoes anywhere might seem tricky, especially to new gardeners. But by starting with the basics, they really are not so difficult. While there are many nuances and tricks for growing huge crops and large fruit, most gardeners grow a few tomato plants in their gardens each year. Tomatoes, once called the poisonous love apple, have long fascinated gardeners.
Where did the tomato come from? While many scientists and historians believe that the tomato was selected from wild fruit of the nightshade family, domesticated more than 11,000 years ago, I would argue that the earth is not that old. What we do know is that the tomato was being used in Central America and brought to Europe by Spanish Explorers. In Europe, it was mostly used by the Italians and they helped to popularize it.
Choosing a Variety of Tomato
Yes, tomatoes are members of the Nightshade Family, as are eggplant, potatoes, and others. The leaves are poisonous, containing solanine. But the fruit, raw or cooked is delicious. Although, taste may be different between individuals. My son and daughter dislike fresh tomatoes, but will eat them in salsa and sauce.
When you are making the decision to grow tomatoes in your garden, you are embarking on a difficult journey. There are more than 10,000 varieties across the earth. Most seed companies divide tomato varieties into groups by skin color or size to help gardeners choose. In garden centers and big box stores, you may find anywhere from 10 to 100 varieties each spring.
Picking a tomato now sounds even harder. But what are you growing tomatoes for? For fresh eating during summer and fall? Or canning and freezing? Or just to try something new? These questions plus how many people in your family can help decide.
Tomato Varieties for Fresh Eating/Salads
If you are trying tomatoes for the first time and just want to sample a few varieties before diving into canning and processing, then you need to start here. 1-2 plants, depending on variety, can easily supply a household of 2-4 people for fresh eating/adding to salads. For 4 to 8 people in the home, 3 to 6 tomato plants will suffice. The following varieites I would recommend to anyone just wanting a sample of the variety out there.
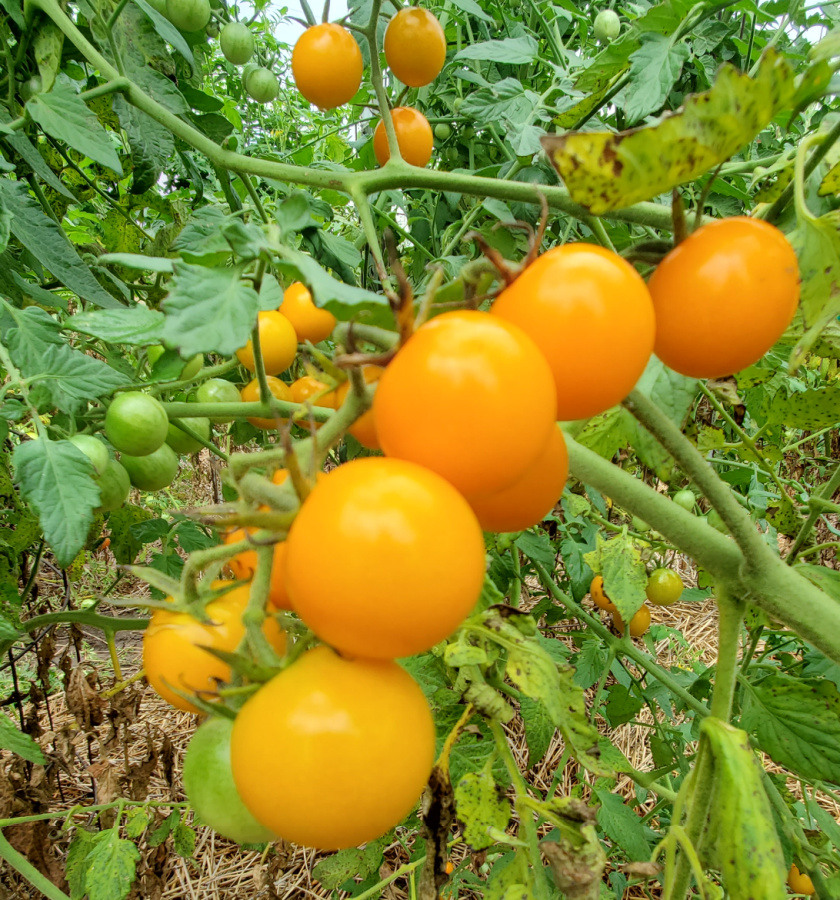
- ‘Sungold’ – one of the best yellow-fruited, cherry sized tomato. Golden orange skin when ripe. 1 inch across. Plants are indeterminate.
What is indeterminate? This is how tomato plants grow. Indeterminate means that the plant continues to grow throughout the year. Plants that are determinate grow to a certain size, then stop. Most bush types and many hybrids are determinate. Most heirlooms and cherry tomatoes are indeterminate.
- ‘Green Zebra’ – a green tomato with yellow stripes, this is one of my favorites for fresh eating. Fruit are 1.5 to 2.5 inches across on indeterminate plants.
- ‘Yellow Pear’ – an unusual shape, looking like a small, yellow pear for sure. It is tasty, growing 1 inch across on indeterminate plants.
- ‘Black Cherry’ – a dark red cherry type tomato, growing 1 to 1.5 inches across on indeterminate plants. Very sweet and delicious.
- ‘Jet Star’ – one of the most well-known slicers on the market. Very nice flavor and sized 3 to 5 inches across. Low acid for a red tomato on indeterminate plants.
- ‘Brandywine’ – a larger beefsteak type tomato which grows 4 to 8 inches across on indeterminate stems.
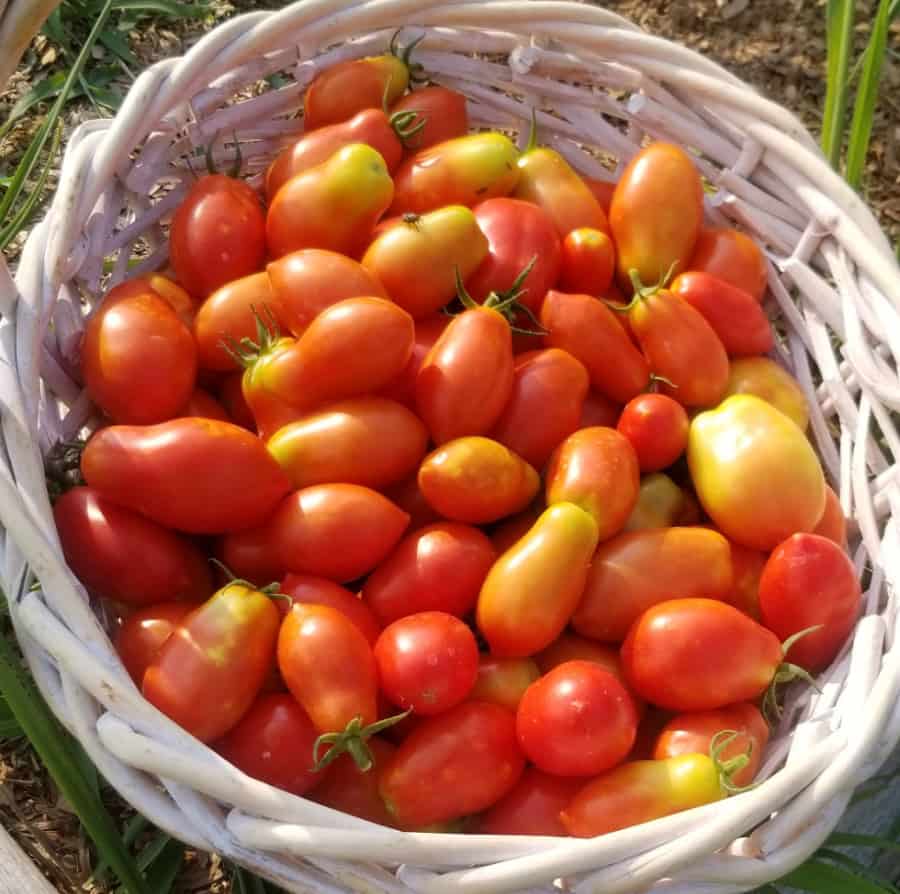
Growing Tomatoes for Canning and Freezing
If you are gardening or growing tomatoes for the first time (or second time) and are looking to grow enough to can your own sauce, or salsa, or juice, then you want to plant several plants. These need to be heavy producers which will be best for this process. There are specific varieites grown for canning and home consumption, though any tomato in large quantities will work. Find a recipe for tomato sauce here.
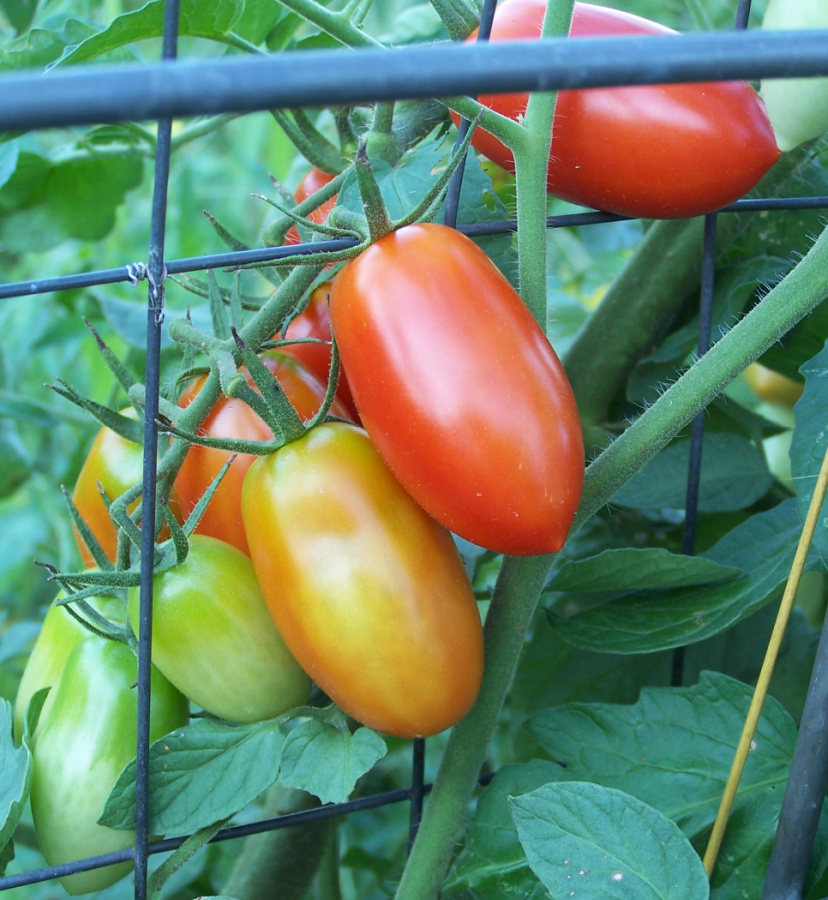
- ‘San Marzano’ – is called a paste tomato, growing 1 to 2 inches across and 3 to 6 inches long. This was my best produces in 2021, and we canned much sauce from it. Indeterminate plants.
- ‘Amish Paste’ – another great paste type, growing 1 inch across and 4 inches long. I have always been impressed by this indeterminate variety.
- ‘Mortgage Lifter’ – this has always been my most reliable beefsteak type in hot weather. When other varieties quit producing blooms, this one keeps going. Indeterminate with large, red fruit.
- ‘Pink Oxheart’ – is another large tomato shaped like a heart. 1 to 2 pounds per fruit, on indeterminate plants. Good producer.
Planting versus Direct Seeding Tomatoes
Now that you have some seed varieties chosen, you have to look at preparing for the planting season. Tomato growers will tell you that you need a jump on the season. Here in Northeast Kansas, we start our tomato plants indoors sometime in February or March, planning to put them in the ground in May. But why choose plants over seed sown directly to the garden?
To get a jump on ripening that is why. If you can get plants into the ground in May, when the soil temperature is warm enough, then you can usually get fruit in late June or Early July. Most of my gardening friends try to get tomatoes for July 4th.
How warm does the soil have to be for tomato planting? Ideally, the soil should be 65 to 75o F, but most people put plants out when the soil hits 60o F. This can be determined with a soil thermometer, which most hardware stores and nurseries sell.
Planting Tomatoes in Pots
If you are not able to plant your own tomato plants in a greenhouse, or under lights in a warm room in the house, plan to buy from your local nursery. Here at Grimm’s Gardens, we carry 15 to 30 varieties of tomatoes each spring.
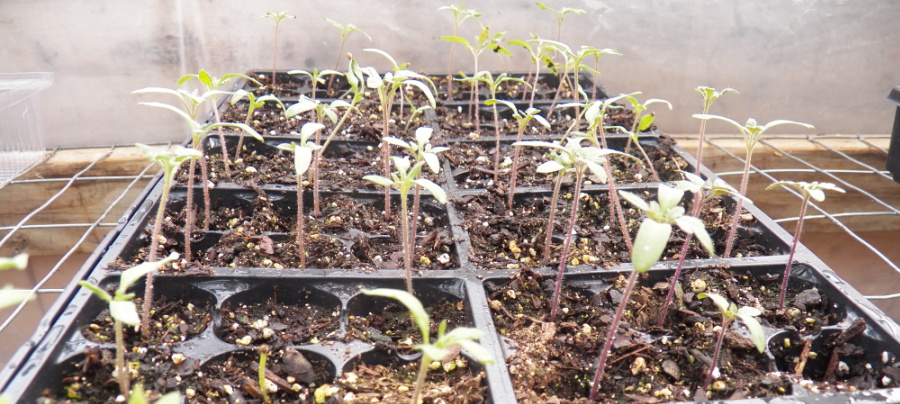
If you have planted seeds in pots before, then you just need to barely put the tomato seeds in the soil, at a depth of 1/8 to 1/4 inch, cover with potting soil, and water in. Seeds germinate between 6 to 12 days after planting. Plants are ready to plant outdoors when they have 4 to 6 true leaves and the soil when popped from the pot is covered but not bound up in white to lightly tan roots.
Prepping the Soil and Planting
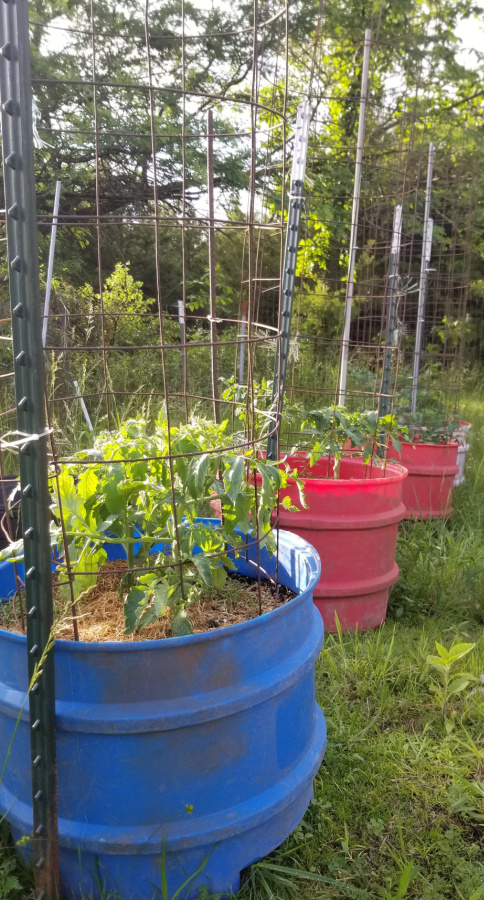
If you are just doing a couple of plants in the garden, or on the patio, a large container may be the way to go. Instead of prepping a large area of ground, I like to repurpose used mineral tubs for tomatoes. These tubs are 2.5 to 3 feet across and tall, and can hold 1-2 plants. I fill the lower 1/3 of the container with corrugated tubing, then weed fabric, followed by soil. This creates a self-wicking or watering container. For more info check out this video from Gardening With Leon.
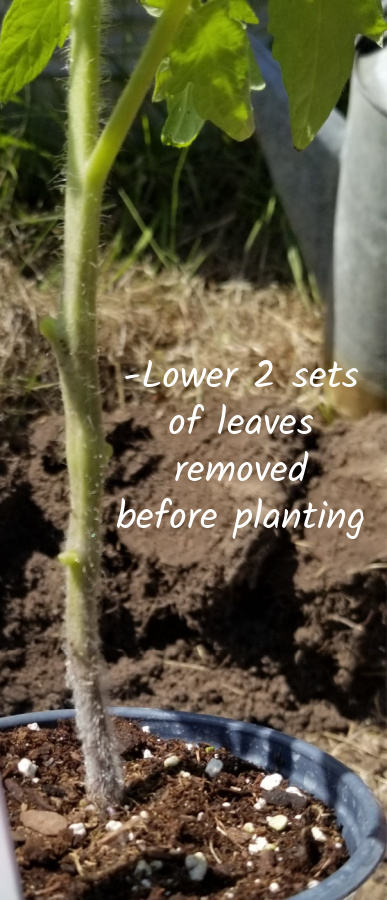
I use potting soil for my containers, mixing new in each season. Tomatoes are best planted deeply, after removing the lower 1-2 sets of leaves, and covering above the leaf scars. This will promote adventitious roots along the stem, which will help anchor the plant. It also promotes a thicker, bigger stem.
What are adventitious roots? They are aerial roots which often appear as small bristles on the stem and which will grow into roots when place in contact with soil or water.
If planting into the ground, be sure to space plants 3 to 4 feet apart to allow for maximum growth. Do not till the soil as this causes a hardpan of soil compaction below the soil surface which roots cannot penetrate. If using last-season’s garden plot, make sure to rotate tomatoes away from other nightshade areas. In other words, do not plant them where tomatoes, potatoes, peppers, or eggplant have been, for at least 2 seasons. These plants share diseases and pests.
What About Fertilization?
Right. This is a critical step when planting tomatoes. I use a mixture of Epsom salts, rabbit manure, and bone meal in the bottom of the hole when planting. You do not have to do this. Just make sure to use an organic fertilizer that is balanced in nitrogen, phosphorus, and potassium, It should have a number like 10-10-10 on the package. Too much nitrogen will cause quick growth and keep the plant from maintaining calcium levels, which causes blossom end rot. Excess moisture will also cause this problem. More on blossom-end rot below.
If you do nothing else, add chopped eggshells into the hole before planting, this will help prevent calcium deficiency.
As Tomatoes Grow
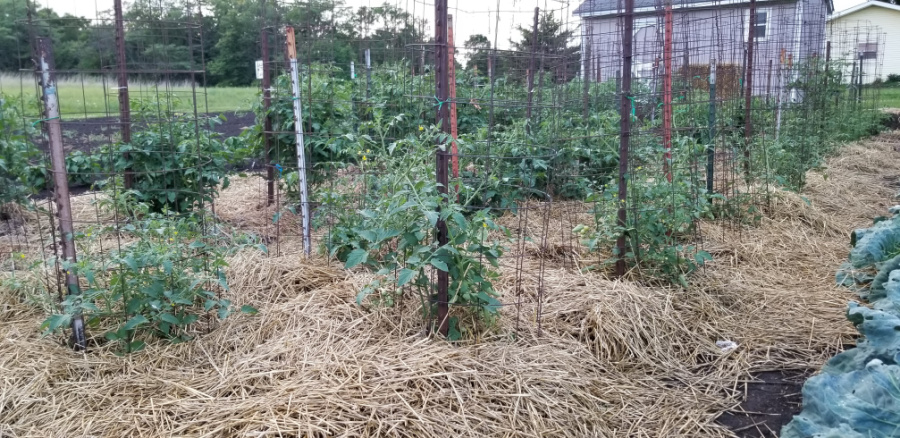
After planting, should be mulching. Many gardeners (including my wife) do not realize the value of mulching in the garden, because their parents or grandparents did not do it. Mulching is not some new innovation however. Look at the earth around us, there is a covering (mulch) on it for everything growing from the soil. It is renewed annually by falling leaves and dying plants.
Mulch does more for the plants than we can know. What we do know is that it helps regulate soil moisture and temperature. It gives microorganisms a place to start working and hide from bigger threats. It prevents soil erosion and rain splatter (which causes diseases).
Mulch should be 2 to 6 inches deep. I like to use chopped alfalfa, straw, wood chips, or grass clippings/leaves in the garden around my tomatoes and other vegetable plants. The deeper the mulch, the more regulation of soil temperature and moisture there is. Also, as it composts, the mulch adds organic matter to the soil, enrichening it and making the need for fertilizers less.
Staking and Caging
There are a myriad of ways to contain the growth of a large tomato plant. Most indeterminate types grow 6 to 12 feet in one year, sometimes bigger. A cage or trellis system is needed to keep it all from overtaking the garden like the neighborhood zucchini. I use cages made from concrete reinforcing wire, 2.5 feet in diameter, 5 feet tall. Attaching them to T-posts in the garden (or mineral tubs), I can keep the cages from toppling from the weight of plants. Space cages 3 to 4 feet apart for easy harvesting.
There are other trellising options for beginners that may work as easily, and have less initial input. If you are growing just a few plants, put them side by side next to a cattle or hog panel. 1 panel 8 feet long can hold 2 to 6 plants evenly spaced. Tie the plant to the panel loosely with zip ties, or use gardening twine. The panel should be secured with t-posts.
Small v-shaped “tomato” cages are not sturdy enough for the indeterminate types listed above and are best used for determinate bush varieties or for pepper plants.
Pruning
Tomatoes do need some pruning in the early parts of the season, although most gardeners forgo the pruning as the season extends, usually due to other time concerns. To prune them, simply snip off ends of the plant as it dives into the walkway, other cages, or other plants.
Pests and Diseases of Tomatoes
This is where many first-time gardeners get overwhelmed. But for me, as a consultant, I love seeing everything that can and will happen in the garden. While there are many diseases and pests that may attack your tomatoes, there are only a few that are serious enough to talk about right now. Dive on in.
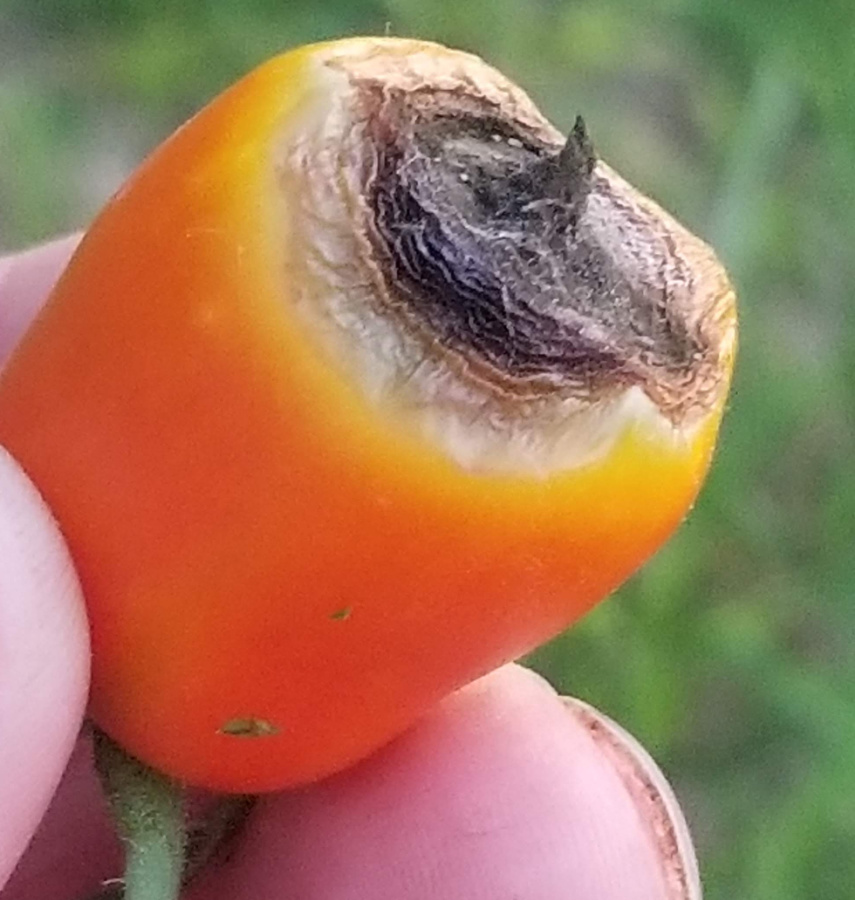
Blossom-End Rot
This is perhaps the most annoying of fruit problems of the tomato. And yet, it happens on lots of other fruit too. But for the gardener, it is worst on tomatoes, probably because they produce so many fruits. Blossom-end rot is caused by an induced loss or inability to obtain calcium from the soil. Often, the calcium is already there, waiting to be absorbed, but cannot be because root function is minimalized by excess water or nitrogen.
Avoiding high nitrogen fertilizers for tomatoes is the first step to preventing this problem. Adding calcium to the soil when planting can also alleviate the problem. This is done mostly with chopped eggshells, bone meal, or Epsom salts. Although, the bone meal works best in my gardens.
The best solution for avoiding this disease is water properly/mulching. Mulching prevents rapid drying of the soil and prevents moisture extremes. Tomatoes are best watered with a drip irrigation system, although overhead watering can be efficient, but also cause other diseases.
Verticillium Wilt
This disease can seem to spread through the plant overnight, though many just overlook the early symptoms. It is a soil borne disease which causes foliage to turn yellow, with brown blotches. Portions of the plant them wilt and often die.
Reduce or remove the problems of this disease by crop rotation and mulching. Also, planting resistant varieties will help. Mulch prevents soil splatter from rain, which moves the fungal spores of the disease onto the leaf surface of the plant.
What is crop rotation? Crop rotation is act of planting crops or vegetables in a new location each season. If you have a large enough garden space, you can rotate crops from bed to bed, not going back to the original spot for as much as 6 seasons in between. Do no plant members of the same plant family back to back in beds, to prevent past diseases and pests.

Tomato Fruitworms
There are a variety of moth caterpillars which, when on tomatoes are called tomato fruitworms. These are the most serious insect pests, as they mostly feed on the fruit. Finding them can be tricky. Often, you will see damage to the fruit, but the caterpillar is hiding among the leaves. Learning to focus on the leaves and find the caterpillar can be quite an accomplishment. One key is to look for the small, black fecal matter (poop) left behind. There is usually a trail right to the pest.
Below are various caterpillars that are called tomato fruitworms.
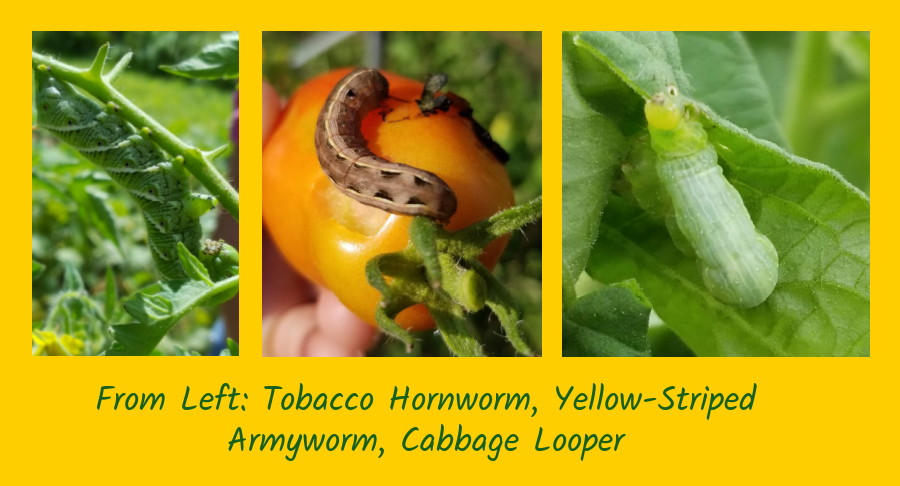
Handpicking the larger fruitworms is the easiest method of controlling them once they arrive. I like to drop them into a bucket and take to my chickens or ducks for excitement. If you have kids, they may want to stomp the pests. Or just drop them into a bucket of soapy water.
You can prevent them with bug netting, but this can prevent proper pollination, which is done mostly by specialist bees. Another interesting option, at least with tomato hornworms, is to let them be and see if parasitoid wasps kill them. Parasitoid wasps lay their eggs on the caterpillar and the developing larvae eat it from the inside. See photo below.

Blister Beetles
In my experience, blister beetles are worse than tomato fruitworms. This is because they feed in groups on the whole plant, instead of a single or couple of caterpillars. Blister beetles can be black, gray, striped brown, or greenish. They excrete a caustic skin irritant when handled which causes blisters in susceptible people.
I usually treat blister beetles with caution, preferring to knock them into a pail of soapy water (works great for Japanese beetles too!). If there are too many to control easily by this method, switch to a natural pesticide. Diatomaceous earth can be spread on the plants to kill the beetles, if there is no rain in the immediate forecast.
Other chemicals which work well to kill blister beetles include spinosad and neem oil. Please read and follow all directions before using these products.
Harvesting and Enjoying Tomatoes
Picking your first ripe tomato is an accomplishment well worth celebrating. I usually celebrate the first tomato of the year by eating it in the garden. It is usually a black cherry tomato. You can wait to pick your tomatoes when they are fully colored up, either red or yellow. Green tomatoes are actually ripe when they show a slight yellow blush.
Or you can pick tomatoes when they first start turning color, and ripen them on the counter inside. Once they start turning color, they will finish ripening off the vine or on it. We like to pick ours early, before full ripe, to lessen the potential damage from insects and animals. On the counter, they can last 7 to 10 days before being attacked by fruit flies or rotting.
I enjoy fresh tomatoes in a variety of ways. Sometimes I take a big slicer and salt and pepper it lightly. Or dip it in ranch dressing. Or mixed it together with vinegar, salt, and sugar, and cucumbers and onions. Go to the recipe below here.
Conclusion
Growing your own tomatoes is a rewarding task. There are few things as enjoyable for a gardener as eating that first of the season tomato in the garden. Fresh tomatoes contain a variety of antioxidants and vitamins, making them a delicious addition to the garden. Start planning to add them to your garden today.
Happy planting!